Wading Boots and the Great Felt Debate

Putting on Waders by a Smoky Mountain Trout Stream
Wadering up

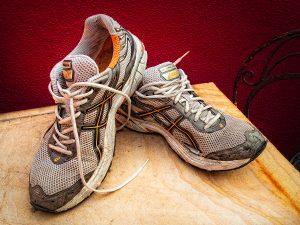
When I first got into fly fishing, I didn’t have any money. At that age, you simply had to get what you could get when you could get it. That usually meant holding out until birthday or Christmas. I had a cheap rod and reel outfit and a box of flies. My fishing “vest” was my uncle’s old Marines shirt with the sleeves cut off. The bellows pockets on the front were plenty big to hold my one fly box and any other accessories. And I had a pair of fingernail clippers, Trim brand, hung around my neck on a piece of fly line. My wading gear consisted of cutoff Duckhead shorts and an old pair of Asics running shoes.

Old Pair of Asics Running Shoes
My First Pair of “Wading Boots”

I slowly started to accumulate better gear. But it wasn’t until much later that I even considered buying actual wading gear. On the smallmouth streams of central Kentucky where I cut my teeth, it just wasn’t necessary. And when I did eventually start fishing the 50-degree tailwaters for trout, I guess I was just too young and full of testosterone to notice the cold. That changed when I waded the Cumberland River tailwater one rainy November day and somehow narrowly avoided hypothermia. On the top of my list the following Christmas was a pair of neoprene waders and rubber soled wading boots. I didn’t know much about felt soles and thought the rubber soled boots would be more durable.

Fisherman Falling in the Water
A Bad Step

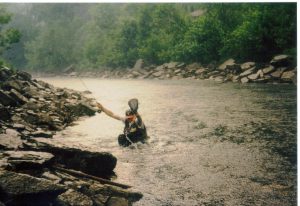
In the mostly cobble-bottomed tailwaters where I was fishing, the rubber soles were adequate. All was right in my fly fishing world… until I went to the Smokies. That first trip to the Smokies provided me with countless views of the sky as I spent nearly every moment on my back. I’d get up, take a step, then slip again. Seems that even the best waders don’t keep you dry when they’re full of water! It didn’t help that my first Smokies trip was to Abrams Creek. It’s possibly the slickest stream on the planet. But it definitely made me begin to question my choice in wading gear.

I soon replaced the rubber-soled boots with felt, and eventually began wearing breathable waders when they hit the market. And I quickly realized why countless fly fishermen chose felt soles and had been doing so for decades. They are vastly superior to rubber when it comes to providing traction on slick, rocky stream bottoms. As a matter of fact, at the time, major fly fishing companies like Orvis didn’t even offer a rubber sole option in their catalog.

Felt Sole Wading Boots
Felt Sole Boots

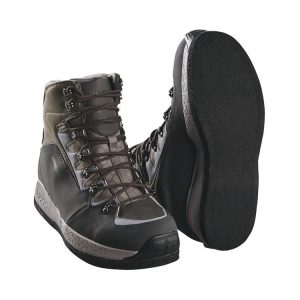
Fast forward about 30 years and look at an Orvis catalog, web site, etc. You’ll find almost all rubber sole wading boots with only one or two felt alternatives. Why the change? The spread of exotic organisms from stream to stream.

While there are a number of different ways these exotics can be spread, many scientists pointed to felt soles as a big culprit and one that could be controlled. It sparked a movement where some
Felt Soled Boots popular fly fishing destinations added boot cleaning stations at select river access points, a few states went as far as banning felt boots, and fly fishing companies began aggressively looking for alternative bottoms to their boots.

The result has been a variety of different tread designs, all created on a Vibram rubber sole or variation thereof. Some companies, like Simms, even went so far as to discontinue production of felt sole boots entirely, while most manufacturers chose to offer both. After a short time, likely due to a significant dip in sales, Simms returned a couple of felt sole options to their product line. The problem was, despite companies’ claims that these new soles were as good as felt, many fishermen didn’t agree. In fact, some fishermen in “felt ban states” even took the whole, “I’ll quit
Typical Vibram Soles wearing felt boots when they pry them from my cold, dead feet” approach!

Vibram Wading Boot Soles
Typical Vibram Sole

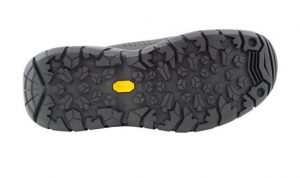
To be fair, all of these new rubber sole designs are quite different and way better than those rubber sole boots I had 30 years ago, and they’re light years better than an old pair of running shoes. They even offer some real traction advantages to felt when it comes to trail use and scrambling up and down banks.

But the fact is, they are nowhere near as good as felt when it comes to providing traction on a slick streambed. I suppose you could just call that an opinion but I like to think it’s based on more than just preference as I routinely field test many of these new boots. As part of my field-testing, I will spend some days on the water wearing the rubber sole on one foot and a felt sole on the other. Time and time again, the rubber sole slips in places where the felt does not.

Vibram Wading Boot Sole with Studs
Vibram Rubber with Studs

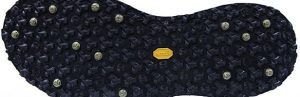
An alternative is to wear rubber soles with studs. This is probably the closest thing I’ve found to felt as far as traction on the stream bottom goes. However, these have a real tendency to slide and slip on dry rocks, posing another safety risk if you do a lot of rock hopping on smaller streams like we have in the Smokies. The other downside to studs is that they are noisy. That’s probably not a big deal on a larger, deeper, swift river, but if you’re trying to sneak up on a pool in a smaller, shallower headwater
Vibram Rubber Soles with Studs stream, you’re going to spook a lot more fish.

So, we’re kind of left with this whole responsibility vs. practicality debate. Most younger and/or newer fly fishermen are readily going with the rubber designs – some probably because they’re the current, cool thing, and others probably because they don’t know any better. They’ve never worn felt so have no basis for comparison. It’s the guys that have been around (like me) that are the problem. For us, trendy new designs aren’t nearly as important as staying upright!

Okay, maybe trendy designs aren’t that important to me, but being a responsible fisherman is, and that’s where it gets tricky. As an environmentalist, I take it very seriously. I certainly don’t want to be responsible for the spread of exotic organisms, but again, I do want to stay upright. As someone who wades creeks every single day, I need to be as sure-footed as possible not only for my own safety, but sometimes for the safety of my clients. Fortunately, with a little planning and/or extra effort, you can wear felt soles responsibly.

The biggest issue with felt is that it dries slowly. So, if you pick up some weird organism in one river system and go to another totally different river system the next day, you could transport that organism with you because it can stay alive in that wet felt. As soon as the soles dry, any organism you pick up will likely die. For most fishermen who are fishing no more than once a week, those soles have plenty of time to dry. Even so, it’s a good idea to clean them to be safe.

For someone like me, who is on the water every day, my soles almost never completely dry until the end of the season. But I don’t worry too much about it because I am constantly going to the same “system” of streams. I’d be picking up something in Little River and transferring it back to Little River! When it is a concern for me is when I’m going to be in the Smokies on Tuesday, the Clinch River tailwater on Wednesday, and back to the Smokies on Thursday. Then I run the risk of transferring something from the Clinch to the Smokies.

My solution for this is multiple pairs of boots. I have one pair of studded rubber boots for tailwaters and another pair of felt soles for the mountains. But if you don’t want to purchase two pairs of boots, you want to own felt soles, and you might want to fish the Clinch one day and the Smokies the next, cleaning your boots in between trips is a must. Many experts will tell you that if you’re fishing multiple river systems in consecutive days as described above, thorough cleaning is the surest way to prevent the spread of exotics, even with rubber sole boots. So it’s just a good habit to get into.

Again, some popular areas actually have cleaning stations for this purpose. There is one at Little River Outfitters in Townsend. It’s accessible whether the store is open or not. Or if you’re going to clean them at home, thoroughly hose the boots off with water and soak them for about 10 minutes in a solution of about 5% bleach and hot water. I’d also recommend scrubbing the soles with a wire or stiff bristled brush. Then rinse one more time with the hose.

Korkers Interchangeable Wading Boot Soles
Korker Boot with Interchangeable Soles

If you’re planning a multi-day fishing trip somewhere and will be fishing numerous river systems, just throw your soak bin, brush and solution in the car and you’ll be ready to go. If you’re going to a state where felt is banned, you can certainly wear felt and take your chances with the law, but that’s a pretty big risk. Yellowstone National Park just implemented a felt ban and the
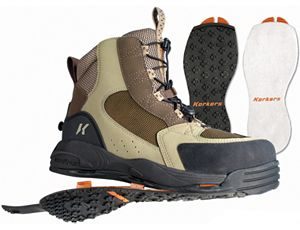
Korkers Boots with Interchangeable Soles penalty can be up to 6 months in jail and a $5000 fine. All of a sudden, the cost of a second pair of wading boots doesn’t sound so bad, does it?

Again, that’s the solution that works best for me. Or you might consider one of the Korker boot models that have interchangeable soles. You can quickly change from felt soles to rubber soles on the same boot.

As with everything I write, this is just one man’s opinion with a few facts mixed in here and there. Find a legal and responsible system that works for you. If you currently wear rubber soles and like them, by all means stick with them. If you mostly fish streams with a more cobble type bottom (like many tailwaters), you’ll probably be happy with rubber. For freestone mountain streams with larger, more slippery rocks, felt is tough to beat and continues to be my preference.

However, I am keeping an open mind and continually looking for that next great felt alternative. Technology and design for felt-alternative boots is getting better every year. I hope to personally be able to make the switch soon.

How Stuff Works: Reels

Orvis CFO Fly Fishing Reel
Classic Fly Reel

Compared to most spin and bait casting reels, fly reels are pretty simple. Yes, there are always exceptions, but the typical fly reel has a single, direct drive. One rotation of your hand equals one rotation of the reel. There have, over the years, been multipliers and automatic reels. But all of the extra gears required for them add a significant amount of weight just to perform a task that usually isn’t necessary.

The drag on a fly reel is also fairly simple. Drag, as it pertains to reels, just refers to the amount pressure the reel puts on the spool as it rotates. If you’re playing a fish on the reel, when he runs, the reel will apply a preset amount of pressure. That is determined by your drag setting. Most fly reels will have some version of either a disc drag or a spring and pawl drag.

Drag Systems on a Fly Fishing Reel
Common Drag Systems

Disc drags are quieter, apply smoother pressure and allow for significantly more variations in resistance. They are often the choice for fish that may be larger or that make long, strong runs. Spring and pawl drags are lighter in weight and provide a classic “clicking” sound desired by many fishermen. They are often the choice for smaller, lighter rods and when fishing for smaller fish.

More expensive reels, particularly those used in saltwater, tend to have fairly sophisticated drag systems. Orvis had a reel a few years ago that touted a drag system modeled after the brakes used on fighter jets! That’s not a bad thing to have if you’re playing a 150 lb. tarpon. It may be a bit over the top for an 8” Smoky Mountain brook trout! The other thing that significantly impacts the price of a reel is how it is constructed and the material from which it is made.

Many inexpensive reels have plastic components in the drag system. They’ll also be made of a lower grade, softer aluminum that is cast from a mold. This will result in a reel that is a little heavier and a little more prone to denting or bending. In addition to non-corrosive, stainless steel (or similar) drag components, often in a sealed housing, higher end reels will be machined from a high grade, bar stock aluminum. This will result in a reel that is lighter, more resistant to the damages of saltwater, and much more durable.

Orvis Hydros Large Arbor Fly Fishing Reel
Large Arbor Reel

Another fly reel feature that is becoming more and more common is a larger arbor. Traditionally, fly reels had a very small spindle to which the line attached. A significant amount of backing was put on the reel before attaching the fly line to fill space on the reel. Otherwise, the fly line would come off in smaller, tighter coils and be difficult to keep straight. Mid and large arbor reels are a little wider than traditional reels and have a much larger spindle. This allows you to retrieve more line in one turn of the reel. It also doesn’t require as much backing. You still want some backing as an “insurance policy” if you hook a bigger fish. But you don’t need 100 yards of it like you did on traditional reels.

If you’re going to be fly fishing in saltwater, the reel is probably THE most important piece of equipment you’ll purchase. However, for most freshwater fly fishing situations, the reel is one of your least important pieces of equipment. Certainly it still has an important function, to store all of your line, but that’s about it. Most of the time when fishing for trout, or bass, or bluegill, you’re going to be playing the fish by hand, stripping the line under the finger on your rod hand to bring the fish in.

So if you’re looking for an outfit for saltwater or even something like salmon or steelhead, and you have a set budget, put as much money in the reel as you can and skimp on the rod. If you’re looking for a freshwater outfit for say, trout or bass, put far less in the reel and more in the rod and line.

Artwork on a Fly Fishing Reel
Reel Art

However, for many fly fishermen, reels are almost like jewelry. I know guys that fish for nothing but mountain trout and have $600 reels. They think they’re neat. Some reels even have elaborate artwork on them to appeal to the jewelry crowd. Sometimes we make choices because they’re practical, and sometimes we make choices because they make us happy. If you have the disposable income and want to buy a $600 reel with a drag system that stops fighter jets to put on your 8’ 3-weight trout rod, have at it! But you don’t need to.

Regardless of your budget, there are a couple of things that you’ll want to make sure that you get in a reel. One, make sure it has enough of drag resistance to prevent the reel from ‘free-spooling” when you strip line from it. Second, make sure that the reel is an appropriate size for your line and rod.

Most reel models will come in different sizes for this reason. Heavier fly line weights will take up more space on the reel so you need a bigger reel to accommodate them and the appropriate amount of backing. On a similar note, rods that cast heavier lines weigh more and need bigger, heavier reels to balance them out. It doesn’t matter how heavy or light your fly rod is. If you don’t have a reel that balances it out, it will feel awkward in your hand. It’s much like carrying two buckets of water rather than one. Two buckets might be heavier overall, but will be more comfortable to carry because they balance each other out. You can view the specs on any reel and see what its weight and line capacity is.

How Stuff Works: Leaders & Tippet

It’s nearly impossible to talk about leaders without talking about tippet, and vice versa. However, we could go into an enormous amount of detail on either of them – so much so that it would defeat the intended purpose of a brief monthly article that attempts to provide a simple definition of how particular pieces of fly fishing gear “work.” So, consider this a broad introduction of how the two things work together as part of the overall fly fishing “system.” We’ll talk about each individually in more detail in future articles.

Orvis Super Strong Fly Fishing Leader Package
Typical Leader and Package

The leader is the monofilament (usually) connection between the weighted fly line and the fly. Most commonly 7’ to 12’ in length, the leader is typically tapered and consists of three parts: the butt, the taper, and the tippet. These parts are completely separate and easily distinguished in formulated leaders created by knotting different diameters of monofilament together. However, most commercially produced leaders are created with an acid process that results in a knotless, seamless taper from top to bottom.

In either case, the butt is the thickest section that attaches to the fly line. Its purpose is to “turn the leader over” with the cast. A leader with no butt, or too thin of a butt, has a tendency to collapse rather than extend and straighten. The tippet is the thinnest part of the leader that attaches to the fly. It allows the energy of the cast to dissipate. As a result, you’re less likely to crash the cast on the water. The tippet also allows for a less visible connection to the fly. The taper is the section between the butt and tippet that provides a smooth, progressive transfer of energy. A leader with a thick butt tied directly to thin tippet tends to “hinge.”

They size leaders by their length and tippet size. So, if you purchase a 9’ 5x leader, it has a tippet size of 5X and its overall length is 9’. As a general rule, longer leaders are advantageous for not only creating more distance between fly line and fly, but for achieving better drifts in “technical” currents. However, they are more difficult to cast and more prone to find overhanging limbs! A shorter leader can allow for more accuracy in tighter areas.

They size tippet by its diameter and indicate the size with a number followed by an “x.” The bigger the number, the smaller the tippet. So a 6X tippet is considerably smaller than a 2X tippet. Without getting too deep into the history of what now seems a rather antiquated system, it all works off the number 11. The tippet size subtracted from 11 equals the actual diameter measured in thousandths of an inch. For instance, 6X tippet is .005”. It works in reverse too. If the actual diameter of the monofilament is .007”, the tippet size is 4X: 11-7=4. Pretty weird, huh?

Orvis Super Strong Fly Fishing Tippet Material
Tippet Spool

You don’t need to know all of that, though. Just remember that you usually choose tippet size based on the fly size. Small flies should have small tippets and big flies should have big tippets. Some leader packages will have cross-reference charts on the back indicating which tippet sizes match which fly sizes. Another neat trick is to divide the fly size by 3. So a size #12 fly would best match a size 4X tippet. Could you use a 5X tippet on a #12 fly? Absolutely. This is just a guideline. But the farther you stray from the guideline the more problems you’ll encounter.

So, tippet is part of the leader. But tippet is also purchased by itself on spools. Tippet material is pulled from the spool and spliced to the leader with a knot to rebuild or alter the leader. For instance, if you start the day with a 9’ 5X leader and you change flies a few times or break off in a tree, your tippet gets shorter and shorter. You can add tippet from a spool when this happens to build the leader back to its original size.

How Stuff Works: Landing Nets

Various Fly Fishing Landing Nets
Variety of Landing Nets

Landing nets enable anglers to land a fish more easily and safely. They are most beneficial when dealing with larger fish. Big fish sometimes make one last dart or head shake when you try to grab them. This often results in the tippet breaking. While in the Smokies, I rarely carry a net. The fish are typically not very large and can be landed by hand with little trouble. A net is just one more thing to carry. But I use a net regularly when fishing tailwaters and delayed harvest streams.

Carbon Fly Fishing Landing Net
Long Handle Carbon Net

Traditionally, nets have been made with a wood frame and cotton netting and that style is still common today. However, wooden frames are more and more frequently being replaced by lighter, carbon frames. Rubber is replacing cotton for the netting. The rubber netting has a number of advantages over cotton. The most notable being that it is better on the fish. Cotton netting can catch and tangle in the fins, gills and teeth of the fish. With trout, cotton absorbs and removes some of their protective “slime.” Fly hooks also catch and easily tangle in cotton netting. Rubber netting eliminates all of these problems and holds far less odor than cotton.

Other things to consider when looking for a net are the size and shape. Obviously, if you’re expecting to catch bigger fish you’re going to want a bigger net. A 20-pound striper just won’t fit in a 16 ½” trout net. They size landing nets by the overall length, including handle, as well as the size of the head (the part that holds the netting). You should choose the size of the net based on the size of fish you’re pursuing. Choose the overall length (or the handle size)  based on how you pursue them. For instance, if fishing from a boat, a longer handle may be desirable since it’s more difficult to get the fish close to you. If wading, a long handled net might be too cumbersome to carry all day.

Magnetic Fly Fishing Net Holder
Magnetic Net Holder

If you plan to carry a net with you when wading, there are a number of options that will help keep the net out of the way, yet easy to access when needed. Most every fishing vest or jacket has a D-Ring on the back. The sole purpose of that ring is to clip your net on it. To make it even easier, there are magnetic connectors that include a section of plastic, “pig tail” type cord that allow you to utilize the net while it remains tethered to you. There are also oversized retractors that accomplish the same thing.

Net Holster for Fly Fishing
Net Holster

Folks who choose to use sling packs or hip packs tend to have trouble finding a suitable location for attaching their net. Attaching it to the pack with a traditional retractor or magnetic connector often leaves it hanging too low or in a location that impedes the casting stroke. I know many who have remedied this by using a type of net “holster” placed on a belt. Store the net with the handle down and draw from the holster when you need it.

Like most things in fly fishing, there doesn’t seem to be a “one size fits all” solution to the type of net you use or the method you use to carry it. It’s a matter of finding something that best fits most of your needs and carrying it in the least obtrusive way possible.

How Stuff Works: Fly Lines

When spin fishing or bait fishing, you cast a weighted lure or live bait with sinkers. You have a reel of monofilament line and when you cast, you propel the weighted lure forward and it carries all of the monofilament line with it.

Fly Line
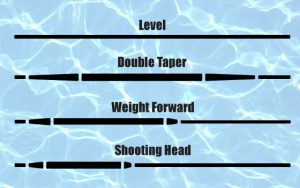
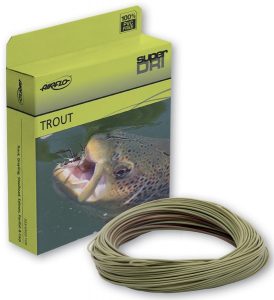
We use virtually weightless flies in fly fishing. Many float on the surface of the water. Even weighted flies that sink don’t have enough weight to carry themselves any sort of distance. We use the fly line for that. In essence, the fly line replaces the weight of a lure. When spin fishing, a weighted lure carries a weightless line when cast. In fly fishing, a weighted line carries a weightless lure.

Most fly lines will have a core of come sort and a plastic coating. Saltwater lines usually have a more rigid monofilament core, while freshwater lines usually have a softer, suppler Dacron core. The manufacturer applies the plastic coating in a way that produces a particular taper. The taper determines how the line will behave and perform.

A weight forward taper is the most common. If the fly line is 90’ long, which is typical, the first 50’ or so that attaches to the backing and the reel will be thinner and level. Approximately the front 40’ of line will be thicker except for the last few feet where it attaches to the leader. The intention is for the weight to be in the front part of your line to maximize casting efficiency at your most common distances. For longer casts, the thicker, weighted portion “pulls” the thinner, un-weighted portion behind it with a technique called shooting line.

There are variations on this weight forward design for specialty situations. For instance, a bass line has a shorter but more dramatic taper. They place more weight in a smaller area. The purpose of this is to aide in turning over the heavier, more wind resistant flies commonly used in bass fishing. Some of these variations are referred to as ‘shooting heads.”

Fly Line Tapers
Fly Line Tapers

A double taper line is becoming less and less popular but is one I still really like for fishing smaller streams like in the Smokies. It has a more gradual taper and it tapers equally from the middle of the line out to each end. This design allows for more delicate, accurate presentations at distances of 40’ and closer, and it roll casts extremely well. It’s also nice because you when you wear out one end of the line, you can turn it around and use the other. It is a disadvantage for distance casting because when you get beyond 40’, you get into the “reverse taper.”

You may also run across level lines, especially at discount type stores. There is no taper to level lines. They can be attractive to the beginner because they are so inexpensive but they cast horribly. Unless you are getting into some specialty techniques, I would avoid level lines altogether.

Most fly lines float. Even when fishing weighted flies in streams, a floating line is most often used because the fly and leader can usually sink enough to get the fly where it needs to be. However, there are sink tip lines available in different weights, where the front part of the fly line will sink to get a fly down deeper and faster. These are more commonly used for streamer fishing in lakes or deep, swift rivers. Full sinking lines are also available but not used very frequently. They allow the entire line to sink but are extremely difficult to cast.

Fly Line Weight Chart
Common Fly Line Weights

Fly lines are sized by a line weight that is designated by a single number like a 4-weight or 9-weight. This is intended to match the same designation on a fly rod, so you would use a 5-weight line on a 5-weight rod. It takes the amount of weight in a 5-weight line to properly flex or “load” a 5-weight rod and make it cast its best.

If you use a 2-weight line on a 5-weight rod, there’s not enough weight to load it. You throw your arm out trying to get the line out. If you use an 8-weight line on a 5-weight rod, it overloads it and it’s hard to control. There may be some specialized situations where you may want to over-line or under-line a rod. But 99% of the time, you want to match the line weight to the rod.

You choose what line weight (and rod weight) you need based on what you’re fishing for. For trout, you’re typically casting smaller flies to fish in clear water and trying to achieve delicate presentations. Lighter lines in the 3 to 5-weight range are common. For largemouth bass, you’re probably fishing more stained water and commonly casting bigger, more wind resistant flies. You’ll be able to better accomplish this with 7 to 9-weight lines/rods.  In saltwater, you probably want heavier lines not only for heavier flies, but also to contend with heavier winds.

Nippers

Fly Fishing Nippers

It’s Time to Quit Using Your Teeth….

Welcome to the wonderful world of nippers! It’s probably pretty easy to figure out that the primary function of nippers (aka clippers, cutters, snips, etc.) is to cut your line. They are mostly used to trim the tag ends of monofilament after tying a knot or to cut a new piece of tippet from a spool. But as you’ll see, the right pair of nippers can perform a number of other tasks as well.

As I described before, my beginnings in this sport were humble at best and my funds were rather limited. There was a lot I could do with $10 back then and I certainly didn’t want to waste it on nippers – not when I could just use fingernail clippers. That strategy served me well for a time, until I figured out what a lot of fishermen eventually figure out. First, they make fingernail clippers out of very cheap, soft metal. After you repeatedly clip monofilament line, they form a series of nicks in the blade. It’s not long before they become completely useless. Second, when regularly exposed to water (such as every time you go fishing), they rust – quickly.

So you can constantly replace in expensive fingernail clippers or you can do what I ultimately did – drop $10 on a decent pair of nippers. They’re rustproof and will last years before the blades begin wearing out. The other benefit to a good pair of nippers is they are designed to cut line, not fingernails. What does that mean?

When working with smaller trout flies, particularly dry flies, it can be difficult to prevent the large, curved head of generic fingernail clippers from also clipping away some of the hackle. The straight, somewhat recessed blades on fly fishing nippers work and cut in tight spaces. Most nippers designed for fly fishing also include another simple but highly useful feature – a small needle.

When a fly tyer finishes a fly, he knots the thread at the hook eye and coats it with a thin, invisible cement. Well, in the world of fly tying, time is money and production fly tyers apply that cement quickly, often leaving an invisible layer in the hook eye. When you need to tie that fly on your line, you can’t get the tippet through the hook eye because it’s coated in glue. This happens even more frequently with painted, hard-bodied poppers, only the paint coats the hook eye. The little needle on your nippers will clear that layer of cement or paint and preserve your sanity when attempting to attach a fly.

Multi Tool Nippers
Multi-tool nipper

As with most any fly fishing product these days, there are seemingly endless nipper styles and features to suit your needs and tastes. Some have a different shape, boasting a better ergonomic design. Others come with additional tools for tasks such as tying knots or sharpening hooks. Want to take it to the next level? Check out this description of Abel’s nippers:

  • Designed, manufactured and assembled in the USA
  • Anodized 6061-T6 aluminum body construction
  • Replaceable jaws – machined out of premium grade Crucible CPM S35VN stainlesssteel, then heat treated to 58-60rc
  • Engineered to cut 7X – 100 lb mono and braid
  • Two Year limited warranty on the jaws after initial purchase
  • Pin – 316 stainless steel
    Abel Nippers
    Trout print nippers

    And they can be yours in black for a mere $85. For custom colors, they’re just $105. And with a cool fish print… a steal at $165. Yep, $165 for line cutters. All of a sudden, $10 for a pair of nippers doesn’t sound too bad, does it? As with anything else, if you have the disposable income and want to spend $165 of it on nippers, go ahead. I won’t judge you.