A while back I shared a video on how to tie the Double Surgeons Knot. The Blood Knot is used to accomplish the same task, to splice two pieces of tippet together. However, there are a few differences between these two knots.
Day in and day out on the stream, I’m going to use the Double Surgeons. It’s quick and easy to tie and it’s a little bit stronger. It also does a better job than the Blood Knot when it comes to connecting tippet that varies significantly in diameter.
The downside to the Surgeons Knot is that it sets a little cockeyed and it’s a little bulkier knot. Neither of these things matter much when you’re working with 5X tippet. You probably won’t even notice. But when you’re splicing thicker pieces of mono together, like butt and mid sections of leader, a more uniform and less bulky knot becomes extremely important. And that’s when the Blood Knot is at it’s best.
Additionally, I’ll sometimes use the Blood Knot with smaller tippet if I’m rigging a two fly rig where I want the top fly to swing independently, rather than fixed as with the in-line system. Fishing two wet flies is a perfect example of when I might do this. I can tie a Blood Knot and leave one of the tags long to attach the top fly. The tag ends on a Blood Knot come out at a perfect right angle and foul far less than the cockeyed tags on a Double Surgeons.
Every year, it seems every fly rod company comes out with a
new rod that is not only supposed to cast itself, but is substantially lighter
than its predecessor. As a matter of fact, the average graphite rod today is
probably about 1/3 the weight of the average graphite rod of 30 years ago. And
that difference is far more substantial when you start comparing the weight of
today’s graphite rods to the bamboo and fiberglass rods that your father or
grandfather may have used. But none of this matters if your rod is not properly
balanced by your reel.
It’s a phenomenon called “levered weight.” If you carry two
20lb. buckets of water, one in each hand, it will feel more comfortable than
carrying just one 20lb. bucket of water in one hand. One side balances out the
other. The same concept applies if you have the lightest fly rod on the market
but have a reel on it that is too heavy. It will feel heavier in your hand than
a heavier rod that is properly balanced by its reel.
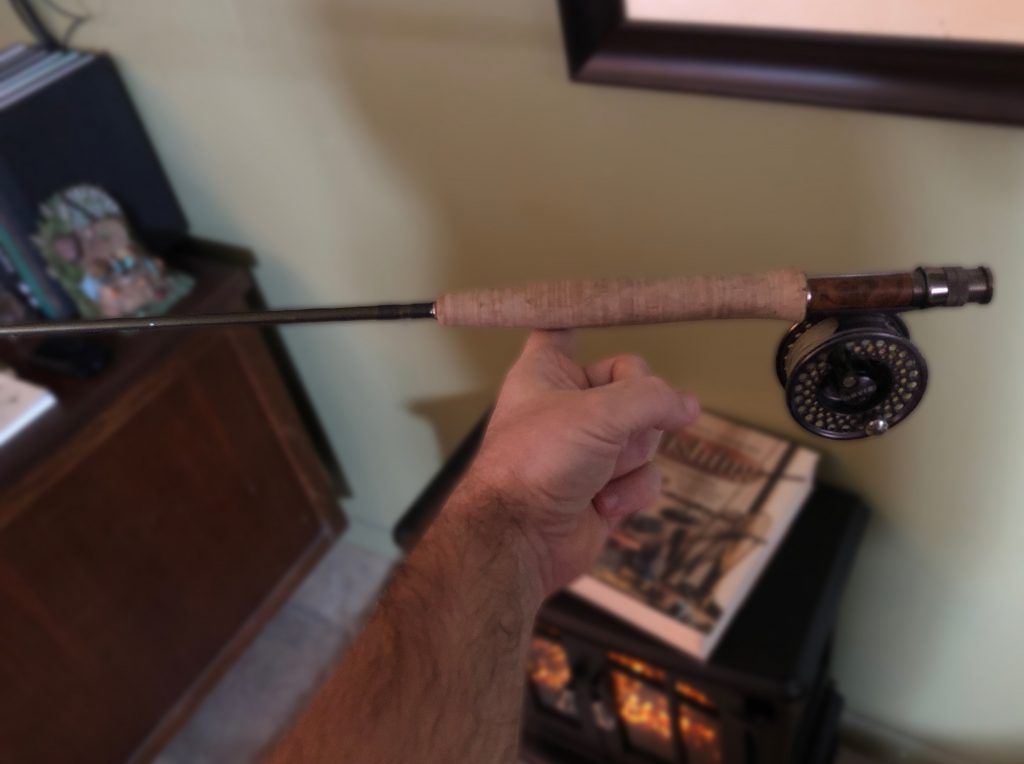
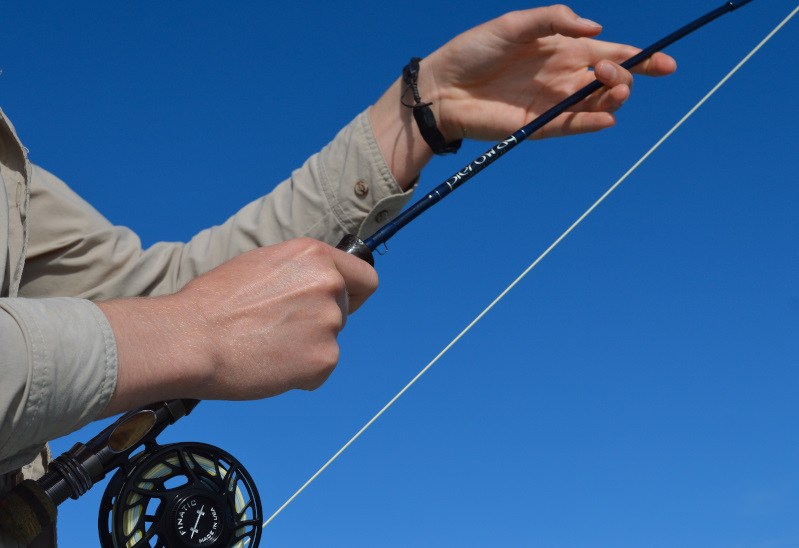
Pretty well balanced rod
When it comes to trout fishing and really, most freshwater in general, your reel does not play a very significant role. Unless, you just have to have “the best,” it is not necessary to sink a lot of money into a reel. However, just because it may not be the most important piece of equipment, doesn’t mean you shouldn’t put some consideration into things like its size. It needs to be big enough to comfortably hold the fly line and appropriate amount of backing, and it needs to balance the rod. In most cases, a rod and reel are balanced if it will self-balance when you set it on one finger positioned near the tip of the cork grip.
In the picture above, the reel is just a little too heavy for the rod. I prefer the balance point to be just a little closer to the tip of the cork. But it’s close enough to not feel uncomfortable.
Most companies will designate specific reel sizes for specific line and rod sizes. If a reel is for 4 – 6 weight lines, it not only means it has the capacity to store those line sizes, but it should balance most 4 – 6 weight rods. Of course, things like the material from which the rod is made and the length of the rod can determine if it actually falls in the “balance range” of that particular reel. If your rod is a short, super light 4-weight, you may want to bump down to the next smaller size. On the other hand, if your rod is a 6-weight bamboo, you may want to bump up to the next larger reel size.
The design of the reel seat on the rod will also be a factor. Almost all modern graphite rods have an uplocking reel seat, which positions the reel just behind the cork grip. Some bamboo rods may have a downlocking reel seat, which puts the reel almost right at the butt of the rod. The latter can help when trying to balance a heavier rod.
As reels become lighter and lighter, it has become far more difficult to find appropriate size reels to balance bamboo rods. However, one reel manufacturer, Ursus, has designed a reel that has removable brass plates on the interior. The weight of the brass plates help to balance heavier bamboo rods. When using the reel on a lighter graphite rod, the plates can be removed. Pretty cool.
In any case, no matter what rod you fish with, keep this in
mind when selecting your reel. It will greatly reduce casting fatigue and
result in much more enjoyable days on the water!
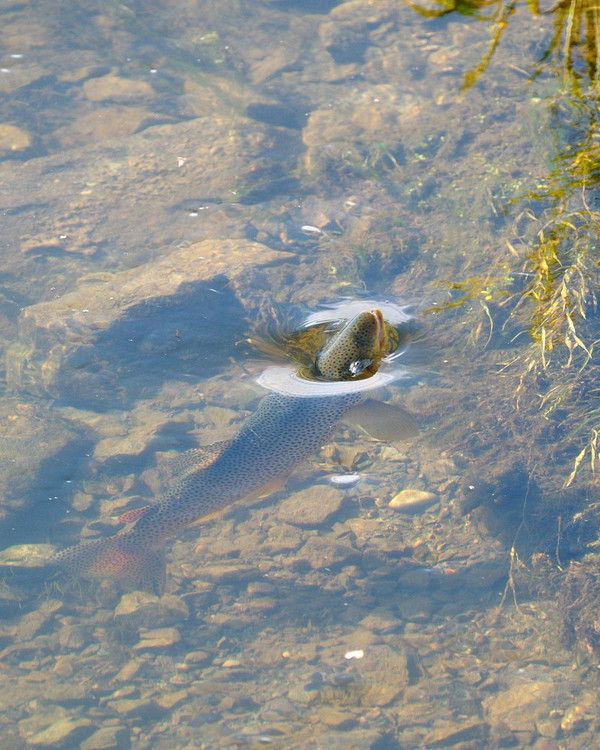
When a trout feeds on or near the surface, it creates a ring
in the water that can appear as a violent splash or a mere dimple. Recognizing
certain characteristics of this rise ring can tell you a lot about where the
fish is positioned, where his feeding lane is, his size and possibly what he’s
feeding on.
Lengthy chapters of vast and detailed information on this topic can be found in a number of well known fly fishing books. I recommend reading them. This article will attempt to condense that information into a useful overview. As always, these are general rules to which there are always exceptions!
Dimple Rise
Common or Simple Rise
A common rise is characterized by a quick view of the trout’s head, dorsal fin, and often “wagging” tail, followed by a boil of water. It indicates that the trout is positioned near the surface and feeding on insects on the surface or near the surface film. The insects are probably medium to large in size. Because of the increased exposure to predators, trout rarely position themselves near the surface unless there is a lot of food available. So, if you see this kind of rise, keep watching. Chances are you will see the same fish repeatedly feeding.
Surface Swirl
The surface swirl is similar to the common rise but without
the appearance of the head, fin or tail. You only see the water boil. In this
case, the fish is probably positioned within a foot or two of the surface and
is feeding on insects at least two inches below the surface. You can spend
hours casting dry flies to these kind of rises without a take, but an
unweighted nymph or wet fly fished just below the surface can be deadly.
Poking or Dimple Rise
As the name implies, this rise form appears as just a dimple on the surface and if you look carefully, you can often see just the nose of the trout penetrate the surface. This rise form also suggests the trout is positioned near the surface but likely feeding on small insects on or just below the surface. This type of rise is most often seen in slower pools and runs, slow edges of currents and eddies.
Splashy Rise
When a rise ring is more of a splash, it can mean a few things. Usually, it just indicates that the trout is positioned deeper in the water. By traveling farther up the column for food, the trout’s momentum often results in more of a splash on the surface. If the trout is positioned deeper, this was likely an opportunistic rise from a fish not necessarily focused on the surface. You may never see him come up again.
Similarly, trout feeding on insects that emerge and get off
the water quickly can display a splashier rise. Caddis flies fit this description,
so many anglers assume (sometimes incorrectly) that a splashy rise means trout
are feeding on caddis. And sometimes a splashy rise can simply be the result of
a smaller, eager trout rising recklessly.
Gulping Rise
A gulping rise is like a greatly exaggerated common rise.
The trout’s mouth is wide open and his entire backside breaks the surface,
followed by an often audible “gulp.” You’re likely to see this type of rise
during very heavy hatches when there are frequently multiple bugs very close
together on the surface. The trout may eat as many as six bugs in one rise. If
you’re seeing this, you’re at the right place at the right time. Try to match
what you see on the water and don’t get your leader in a big tangle!
Jumping Rise
A jumping rise is when the trout completely clears the water, sometimes by a few feet! This could mean the fish is feeding on bugs in the air just above the surface, or possibly something large like a mouse or even baitfish. In any case, a jumping rise suggests a brief moment of opportunity and not a steadily feeding trout. I don’t recall ever standing in a pool and seeing dozens of trout routinely jumping out of the water. Most experienced anglers recognize the jumping rise as fool’s gold, shake their heads and move on.
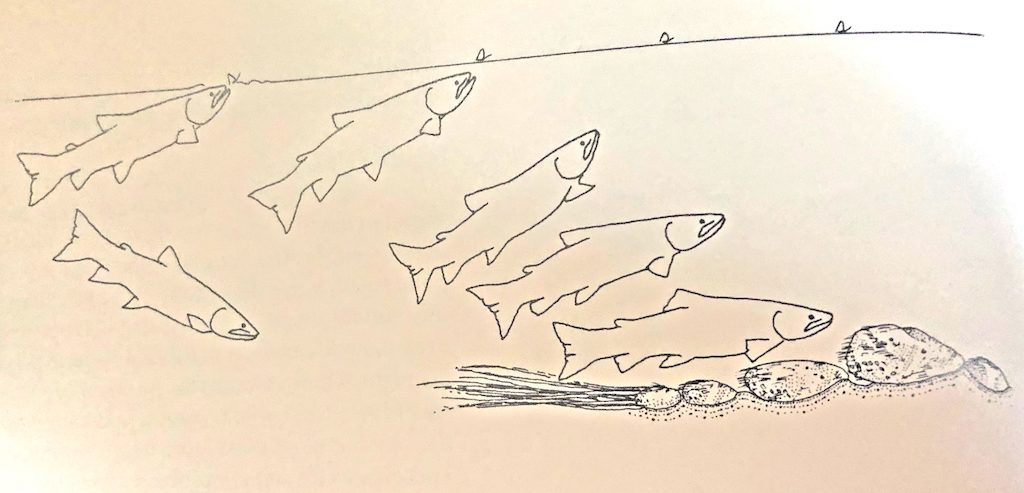
Where is the trout?
As mentioned above, certain types of rise rings can suggest
how deep the trout may be. However, there are other things to consider when
determining where in the stream that trout is positioned.
Trout Position vs. Rise Location – Illustration by Jason Borger
First and foremost, when a trout rises in a stream, he is
going to drift back during the process, then return to his original position. So
the trout is actually positioned upstream of where you saw him rise. If he is
holding near the surface, his position may only be a few inches upstream of the
rise. If he’s holding in deeper water, his position may be several feet
upstream of the rise.
When a trout rises, you’re also going to see a “push” of
water, like a little wave. That wave usually pushes upstream. But if the wave
pushes to one side or another, it indicates that the trout came over to feed.
So, he may be holding in one lane and feeding in another.
There’s a lot to this, I know. The best advice I can offer
is when you see a trout rise, don’t immediately cast a dry fly to that spot.
Think about what the rise looked like and stop and look for others. Identifying
rise rings may not give you all the answers, but it will give you a great place
to start!
Over approximately 30 years of fly fishing, I have broken
one rod. And that was kind of a fluke. About 25 years ago, I was floating
extremely high water on the Cumberland River in Kentucky when I hung a streamer
on some submerged wood. While trying to dislodge it, the river began pushing
the boat toward a “sweeper” that likely would have capsized the boat. Since I
was in charge of steering the vessel, I had to act quickly and the rod was an
unfortunate casualty in my evasive maneuver.
Some might say I’m lucky to have such a long streak without
breaking a rod. And the fact that I’m putting this in writing all but
guarantees I’ll break one the next time I go fishing! It is certainly possible
as accidents do happen. But in the span of approximately 25 years of guiding,
I’ve seen dozens of rods broken by clients. Dozens… and that’s being
conservative! With that kind of disparity, I can’t help but think there may be
a little more than luck at play.
Yes, accidents are going to happen, but there are a number
of things I see anglers repeatedly do with their fly rods that lead to
breakage. And there are plenty of other things that may not instantly break the
rod but will stress it, leading to a seemingly inexplicable break at a later
time. So here we go… Here are the top 10 ways to prevent breaking your fly rod.
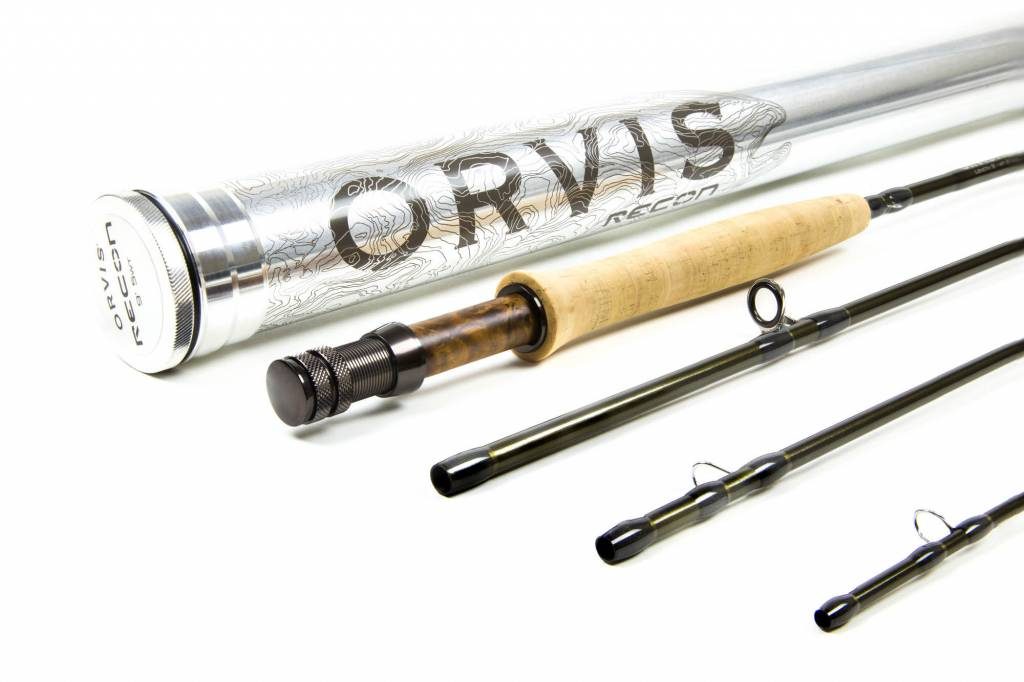
1) Store your rod in a tube.
Rod and Tube
Many rods get broken or weakened in transit. Folks toss them in the back of a truck or the trunk of a car and then set something on them, a cooler shifts, etc. I’ve never seen a rod break while it was in its tube!
2) Be gentle.
This one should be obvious, but it’s not for many. Set you rod down. Don’t toss it. Few things make me cringe more!
3) Keep the tip up.
When walking with your rod, be mindful to
keep the tip pointing up. I can’t tell you how many times I see people jab the
tip into the ground when walking on a trail. Even if it doesn’t break, you’re
potentially damaging the rod every time that happens.
4) Keep the rod ahead of you when walking through the brush.
There are many who disagree with this and
argue that the rod should be pointing behind you when traveling through the
brush. I’m sure I’ll hear from you! Fly line, leaders or rod guides can easily
get caught on branches when carrying the rod pointing behind you. Because you
don’t see it happen, you continue moving full speed ahead and pull hard against
the branch. I’ve seen guides get completely ripped off and I’ve seen rod tips
snap. I like to see where the rod is going so I can steer it around obstacles
in the woods.
5) Don’t hold the rod by its tip section.
I sometimes see this happen when people are
stringing up the rod at the beginning of the day. However, it mostly occurs on
the stream when the line gets tangled near the tip. To reach the tangle, the
fisherman will hold the rod somewhere between the tip and mid section of the
rod while the heavier butt end causes the rod to bend. Your rod is not designed
to do this and it stresses the graphite tremendously. You don’t want to hold
the rod like this in any circumstance, but it’s even worse in the stream when
the reel is attached. To reach a tangle at the tip of the rod, set the butt end
of the rod on the bank or a rock to support the weight.
6) Don’t pull against the limb with the rod when trying to pull a fly out of a tree.
If the line is wrapped in the limb, you may
end up with a broken rod tip. Instead, point the rod straight at the limb and
pull straight back. Or grab the line and pull it with your hand. You’ll not
only protect your rod tip, but you’ll be more likely to break the line near the
fly.
7) Don’t set the rod flat on the ground (or boat bottom).
When taking a break, lean the rod upward
somewhere, like against a tree. Setting the rod flat on the ground is an
invitation for you or a buddy to step on it.
8) When fighting a big fish, use the whole rod.
Don’t Do This!
Many fishermen are taught to put their hand
or finger midway up the rod to apply more pressure on a large fish. Instead,
you are applying more pressure on your rod. Your fly rod is a precision tool
designed to bend in a very specific way. Holding the rod by the handle and not
applying pressure farther up the rod will ensure that your rod is bending where
it should, protecting your tippet and your rod tip from breakage on a big fish.
9) Use the recommended fly line to match your rod.
If you have a 5-weight rod, use a 5-weight line. Sure it’s okay to fudge up one size if you deem it necessary, but routinely overloading a rod with a significantly heavier line can stress the rod over time.
10) Learn how to fall.
I know, I know. This one sounds harsh, but respect the rod! I learned very early on in my fly fishing career to break my fall with my non rod hand. As a matter of fact, when I stumble in the stream, my rod hand immediately goes up!
People are telling me all the time that they don’t fly fish very often because they don’t have anyplace to go. I know as well as anyone that there are an endless number of things that keep us from fishing as often as we’d like, but not having a place to go should never be one. While you may not have a world-class trout stream in your backyard, or even in your state, there are plenty of other alternatives. You may just have to get a little creative.
Bluegill
For instance, almost every city has some sort of park or
green space with a pond. These can be productive little fisheries, typically
containing bass, carp, catfish and some sort of variation(s) of sunfish. They
are a lot of fun to fish and at the very least, they will keep your casting
skills and fishing instincts sharp between fly fishing vacations.
If you’re really lucky, you’ll find a friend who has a farm
pond. These provide all of the same benefits as those city ponds but without
all of the people. I had access to one when I lived in Kentucky that I fished
three or four times a week. Sunfish like bluegill will readily take a fly and
fight as hard as any fish I know. And a big bass boiling on your surface bug at
dusk is a tough thing to beat.
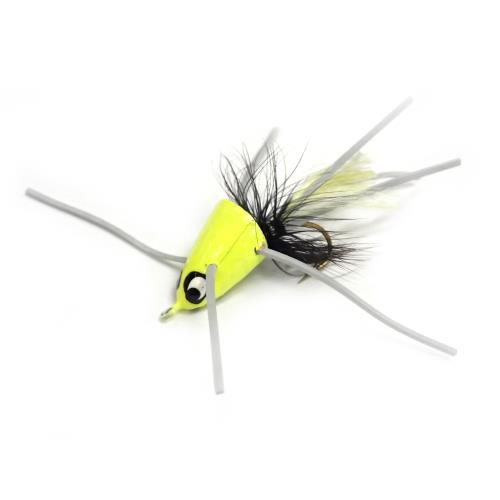
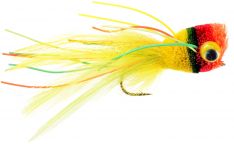
Sneaky Pete
It helps to know what fish are in the pond when deciding what gear to use. You can effectively fish for bluegill with the same outfit you use for trout. A number of small to medium topwater terrestrials will work well. Small popping bugs are a good choice, too. They’ll eat trout flies but they’ll tear them up in a hurry. Therefore, I’d recommend more durable foam or hard-body flies.
As exciting as it is to catch those bluegill up top, I often catch the biggest ones below the surface. Wooly Buggers are productive, as are a large variety of rubber-leg nymphs. However, if you want to get a little more specific about imitating their food source, try crayfish patterns and damsel and dragonfly nymphs. They tend to be attracted to brighter colors. An old fashion Green Weenie has been one of my favorite subsurface flies for bluegill. As a matter of fact, fishing a Green Weenie as a dropper off a popping bug can be very productive.
Whitlock’s Fruit Cocktail
Bass will eat many of the same flies as mentioned above, but big bass are often looking for a little more of a mouthful. A variety of streamer patterns can take bass in ponds and are always a good choice. But I love getting them on the surface when I can. Large hard-body poppers and sliders and spun deer hair bugs are a blast to fish with. However, these larger flies are very difficult to cast with a light trout outfit. If you do much of this type of fly fishing, I’d recommend picking up an 8-weight.
When fishing ponds, look for structure like rock piles and tree stumps. Also, these fish like the edges of things. Cast to shadow edges and the edges of shallow and deep water. In addition, during summer months, expect better fishing early and late in the day.
There are few things more exciting than watching a bass follow and explode on a well presented popping bug! Check out this video from the folks at The New Fly Fisher for some great tips on how to fish them.
For beginners, the leader and tippet represent one of the most misunderstood, or unrealized, components of critical fly fishing gear. Many don’t understand the relationship between the tippet and leader or tippet and fly, while others simply don’t understand what the difference is between the leader and tippet. And while intermediate anglers may have a working knowledge of how the tippet relates to the fly, few take the time to contemplate how the right overall leader design can contribute to their success on the water.
To better understand leader design, let’s start from the beginning and define what the leader is. In simple terms, the leader is the monofilament connection between the heavier plastic fly line and the fly. While it varies in length, the leader typically measures between 7 1/2′ and 9’ and has two primary purposes: To allow for a less visible connection from fly to line and to transfer energy during the fly cast. It tapers from a thick butt section that attaches to the fly line, down to a very fine section that attaches to the fly. The finest section that attaches to the fly is referred to as the tippet.
So, the tippet is the piece
attached to the fly and its appropriate size is determined by what size fly you’re
fishing and how you’re fishing that fly.
At least those are the primary reasons.
Other factors such as water level, water speed, and clarity can also
contribute to that decision. Smaller
tippet sizes are not only less visible to the fish, they offer less resistance
in the water, allowing for such benefits as less drag and/or faster sink
rates. Of course, smaller tippets are
not as strong, but when dead-drifting dry flies or nymphs, the fish is
typically “sipping” the passing fly, not ambushing it, so it is not often an
aggressive strike that will snap the line.
Rather, you are lifting the rod and tightening the line somewhat
smoothly, and then all of the shock absorbing properties of your rod come into
play to, when used properly, help protect that fine tippet and keep it from
breaking.
However, when fishing a streamer
fly, you are usually stripping the fly to suggest the movement of a wounded or
fleeing baitfish, crayfish, etc. This
will most often provoke a more violent strike from the fish, and too light a tippet
will often snap under such a jolt. Since
you are imparting movement on these flies anyway and a dead drift is not
desired, a heavier tippet will better move the fly and better withstand the
more aggressive strike.
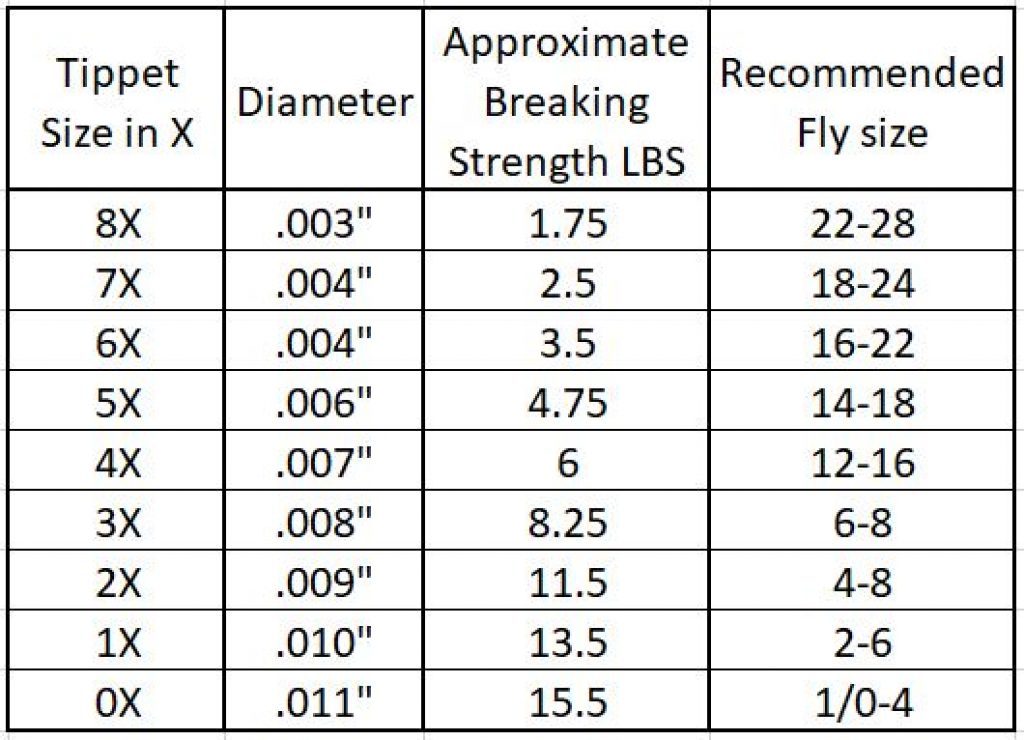
Tippet Sizing Chart
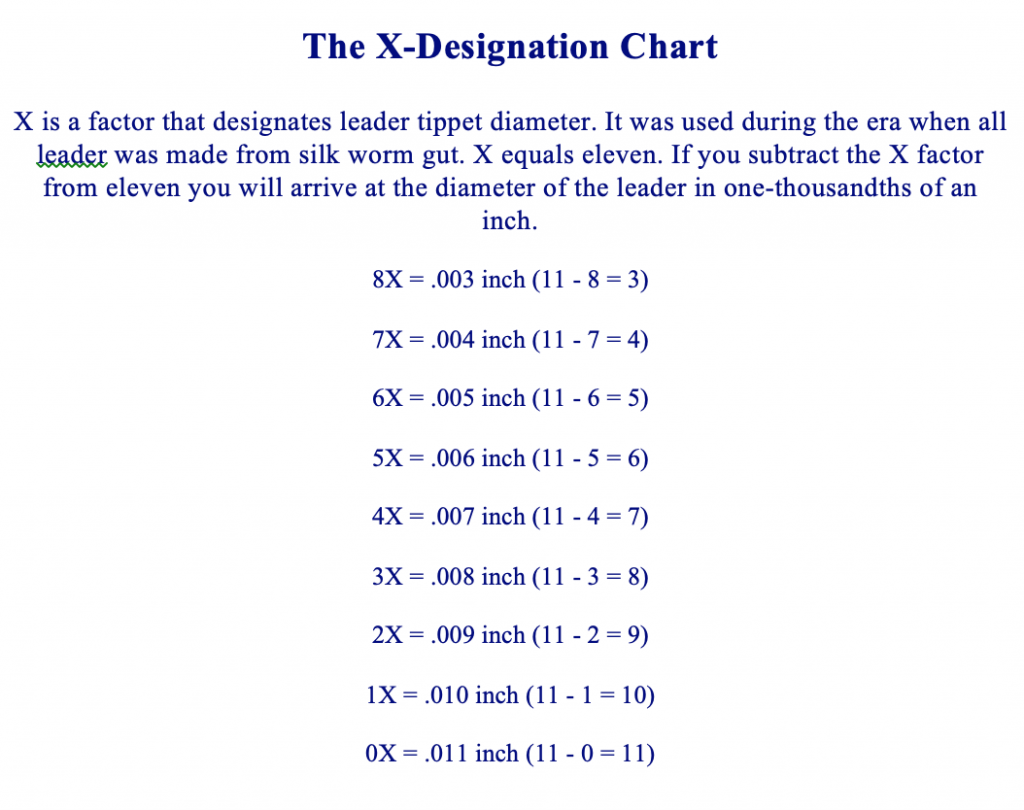
In essence, you want the tippet to balance with the fly for a more efficient cast and drift. For this reason, tippets are sized primarily by their diameter, but also have pound test ratings like spin fishermen may be more accustomed. Those details are all given in the fine print on a tippet spool or leader package but the most obvious marking is a single number followed by an “x” – 4x, 1x, 6x, etc.
It’s a strange system that can be confusing at first, but it relates directly to the diameter of the tippet, so 6x does not mean 6 pound test. Rather it all corresponds to the base measurement of 0x tippet, which is .011”. If I subtract the diameter of my tippet from this base of .011” I get the appropriate “x” designation and vice versa. In other words, if I have tippet that is .005”, 11 – 5 = 6, or 6x. On the other hand if I subtract the “x” number from .011”, it gives me the actual diameter. For 3x, 11 – 3 = 7, or .007”. I know. Wouldn’t you think there’d be a simpler system?
What you should notice is that the bigger the number, the smaller the tippet. So, 6x is smaller than 3x. Fly (hook) sizes work the same way. A size #18 fly is considerably smaller than a #4 fly. But if you know the size of your fly, there is a pretty simple formula to determine the perfect tippet size to match it. Take the size of the fly and divide by 3. As example, for a size #12 fly, the perfect tippet size is a 4x. Who knew there would be so much math in fly fishing?
Tippet to Fly Sizing Chart
It doesn’t need to be this scientific, but using this formula will give you a good baseline in determining a tippet size that will balance with your fly size. You can always fudge up and down as needed. Just keep in mind that when using the above formula, the more you stray to the small side of ideal, the more difficult it will be to turn the fly over with a cast and there’s a better chance of snapping the fly off. The more you stray to big the big side of ideal, the more visible your tippet will be and the more it will negatively impact natural drift.
Without trying to complicate
matters too much, the length of the tippet will also impact things like how
freely the fly drifts. For example, if
you’re trying to dead-drift a size #14 dry fly, you will likely be able to
better achieve a drag-free drift with a 5x tippet that is 20” long than with a
6x tippet that is 10” long. Conversely,
if you are trying to impart movement on a streamer, a 4x tippet that is 10”
long will provide much more control and immediate movement than a 3x tippet
that is 20” long.
All of this is a piece to a
bigger part which is the leader, and a lot of people don’t understand the
difference in the two. Tippet is just a
part of what makes up a leader just like tires are part of what makes up a car. If you merely tied 9’ of straight tippet to
the fly line, you would certainly be able to execute good drifts but you would
have an extremely difficult time casting the fly where you wanted to and would
regularly experience the fly and tippet landing in a pile, just inches from the
fly line.
Therefore, the leader is tapered and consists of three parts: The butt, the taper, and the tippet. We already know what the tippet does. The thicker butt section turns the leader over with the rest of the cast, which helps eliminate piling. The taper section essentially dampens the energy of the fly cast, allowing the fly and tippet to land softly on the water.
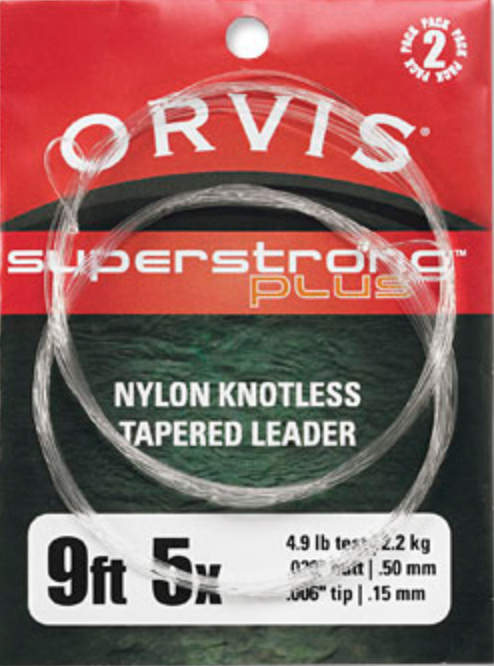
When you buy a tapered leader at
a fly shop, it is usually knotless. They
achieve the taper by running the nylon material through a machine. On the package, it will indicate the leader’s
overall length and its tippet size. So it
might indicate that it is a 9’ 5x leader.
In fine print, you can also see the exact diameters of the butt and
tippet as well as the pound test. It has
tippet built in and is ready to go right out of the package. So what’s with the spools of tippet?
Spool of Tippet
Tippet material can also be purchased on a spool with a number designation as described earlier – 3x, 4x, 5x, etc. This is purely straight tippet with no taper and its primary purpose is to rebuild or alter your leader. When you wear out the tires on your car, you can replace them without having to replace the entire car, and it’s the same with a leader and tippet. Through the course of a day, the tippet on your leader will get gradually shorter as you change flies. Or it may quickly get dramatically shorter if you hang up in a tree or two. What started out as a 9’ 5x leader is no longer 9’ and no longer 5x.
Rather than going to the trouble and expense of changing the entire leader when this happens, you can simply pull an appropriate length of 5x tippet off the spool, tie it to the leader, and you’re back in business. Over time, you’ll cut back so far into the taper that you eventually have to change the leader, but by rebuilding with tippet, you can significantly extend the life of your leader.
As mentioned, you can also use tippet material to alter your leader. You may be using a 9’ 6x leader and want to add an additional few feet of 6x for a better drift, making it a 12’ 6x leader. Or you may be changing flies that vary dramatically in size and style. For example, you might be stripping a #6 Wooly Bugger on a 7 ½’ 3x leader when a hatch of #16 Sulfurs starts to come off. Instead of changing your entire leader, you can simply add a couple of feet of 6x tippet and you have a 9 ½’ 6x leader. Just be sure you’re adding the same size or smaller. Adding a bigger piece to a smaller piece will not only create a weak link above the final section of tippet, it will also create an undesired hinging effect in the leader.
I sometimes tie my leaders rather than buy them from a fly shop. This is done by knotting together different diameters of monofilament to achieve a taper. There are established formulas you can use for this, but through the experience of trial and error, I developed my own formulas that best suit my needs. While I have a lot of specialty leaders, my go-to, everyday trout leaders are all tied ahead of time in a length of 7 ½’ to a tippet size of 3x. Since I’m rarely fishing a tippet size bigger than 3x for trout, this allows me the flexibility to add the final piece of tippet on the stream to match the fly and situation. If I’m going to fish a #14 Parachute Adams, for example, I’ll add a 2’ section of 5x and I’m ready to go.
I first started tying my own leaders when I was on the limited budget of a college student because I realized I could pay $3.50 for a leader or I could make them for about 30 cents each. Over the years, I continued making my own because I prefer them and like being able to design them for my needs. For instance, I find the commercial trout leaders to have too big of a butt section and I don’t like the way they turn over or straighten out. By using a thinner diameter butt and a different type of monofilament for the butt and taper sections, I get a leader that turns over and lays out beautifully. I also like having a few knots throughout the leader as locations to place split shot and strike indicators without them sliding down the line.
I have a variety of other specialized leaders for specific situations. My bass leaders have thicker butt sections to turn over large flies. I have hatch leaders that are long and thin, designed to achieve perfect drifts over wary trout. And I have shorter, small stream leaders for punching flies under tree limbs in extra tight conditions. I also make short leaders designed to fish on sink tip lines when streamer fishing big water.
These are all things to take into
consideration when making your own leaders or even when you buy them at the fly
shop. Understanding the basics like
length and tippet size will inevitably make a difference in your success on the
stream. Better understanding how the
butt and taper figure into the equation will give you vital tools to begin
catching fish that other anglers can’t!
Most of the time when trout fishing with dry flies or nymphs, you try to achieve a drag-free drift. This is also known as a dead drift. Essentially, what this means is you try to make your fly drift at the same speed as the current. That would be simple if the fly was drifting independently down the river. But it’s not. It’s attached to your line. Consequently, line management is a vital skill when it comes to fly fishing success and mending line is a big part of that skill set.
If your leader, or especially your fly line, is in a different current speed than the fly, it will pull or stop the fly when the line tightens. The term we use for this is drag. If your fly is dragging, you won’t catch many trout because it doesn’t look natural. Not only will the trout typically refuse to eat your fly when it has drag, they will often spook. This is especially true when you repeatedly drag a fly over a fish.
When you’re fishing small creeks and/or pocket water, you
can often get closer to the fish because the broken currents help conceal you.
In those instances, you can usually prevent drag by just keeping most of the
line off the water. The less line on the water, the less there is to pull the
fly.
But in slower pools or in bigger, deeper water, you may not be able to get as close to the fish. This forces you to make longer casts. As a result, you’ll have more line on the water. The more line you have on the water, the more currents you’ll have pulling it at different speeds.
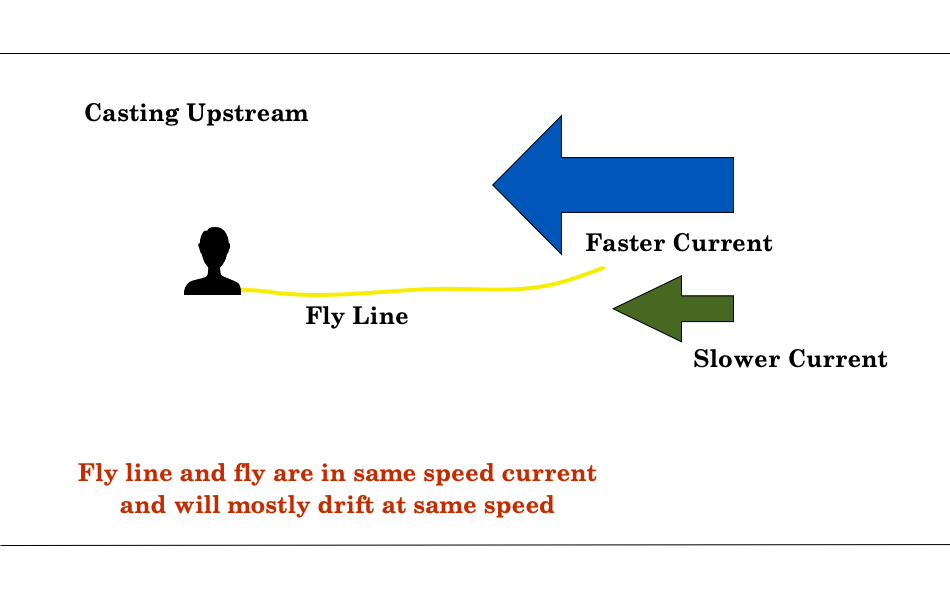
Casting Upstream
When possible, I like to cast mostly upstream when I’m fishing bigger water. This allows me to stay behind the fish and it puts my fly and line more in the same speed of current. When the fly and line are in the same current speed, line management is much simpler. You mainly just have to strip the slack in as it drift back to you.
However, sometimes a particular run won’t allow for a
practical upstream cast. It could be that the depth of the water won’t allow
you to get in the proper position. Or maybe it’s a slick with really spooky
fish and you’re concerned about casting your line across them. You may decide
to get above them and cast downstream.
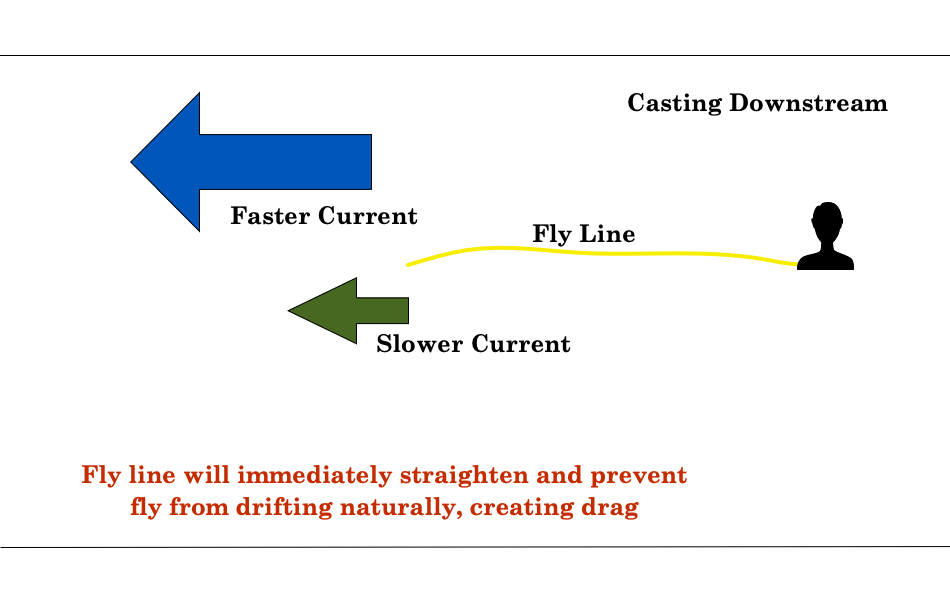
Casting Downstream
You have to be careful with this approach because you’re
moving into their direct line of sight, and anything you stir up while wading
will drift down to them. Excessive debris or a big mud cloud will send them
running. The other challenge casting downstream is the drift.
Downstream Presentation
If you make a straight, fully extended cast downstream, your
fly will start to drag almost immediately because the tight line will prevent
the fly from going anywhere. It just drags in the water. I see a lot of people
try to feed line at this point. But if the line is tight from the start, you’re
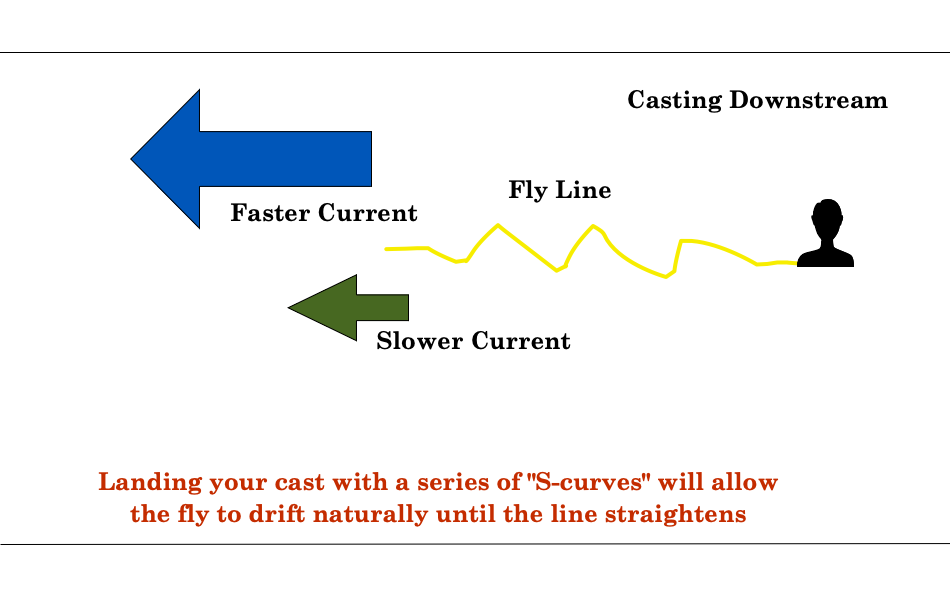
just feeding a dragging fly. The trick is to land your cast with slack in the
line. Using something like a pile cast will allow the line to land with little
s-curves in it. You’ll be able to achieve a good dead drift while the s-curves
straighten out. And if you want it to drift farther, feed line while you have
those s-curves to get a nice, long drag-free drift.
The big challenge is when you have to make a longer cast
across the river. It’s something I avoid if I can, but often, especially on
large rivers, you have no choice. Casting across the river will almost always
put your line and fly in different current speeds. And the longer the cast, the
more different current speeds your likely to find.
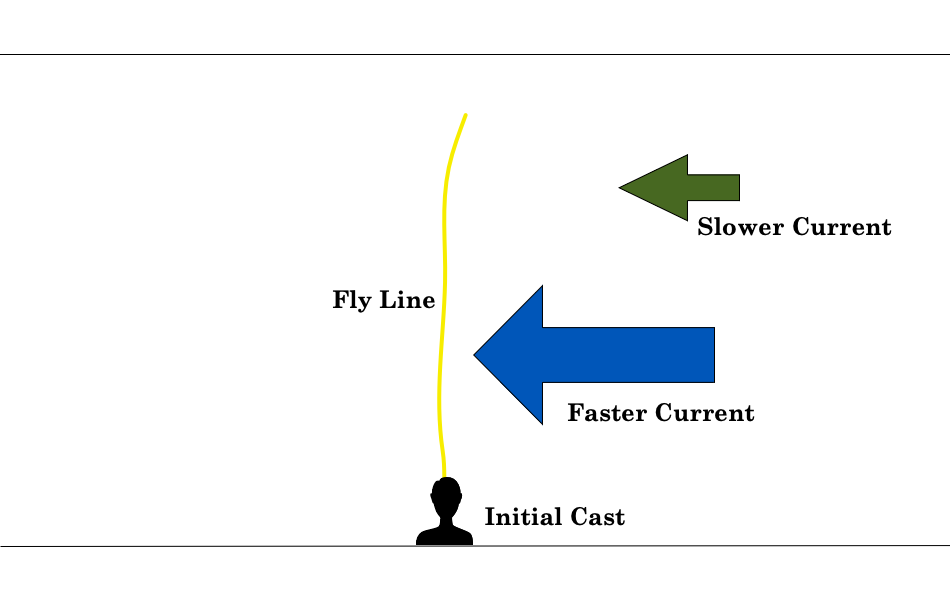
Initial Cast Across River
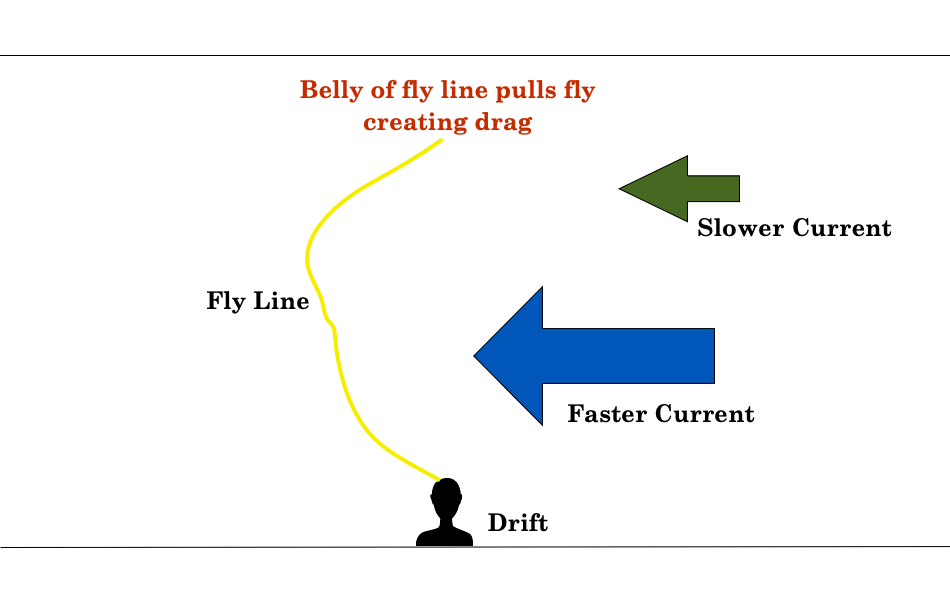
So, let’s say you have a nice, slow current on the other side of a wide run. There’s a fast current between you and the slow current. When you cast your fly into the slow current, your line will lay across the fast the current. Consequently, the fast current pulls the line, the line pulls the fly and you have drag. This is a scenario when you need to mend line.
Drag Setting In
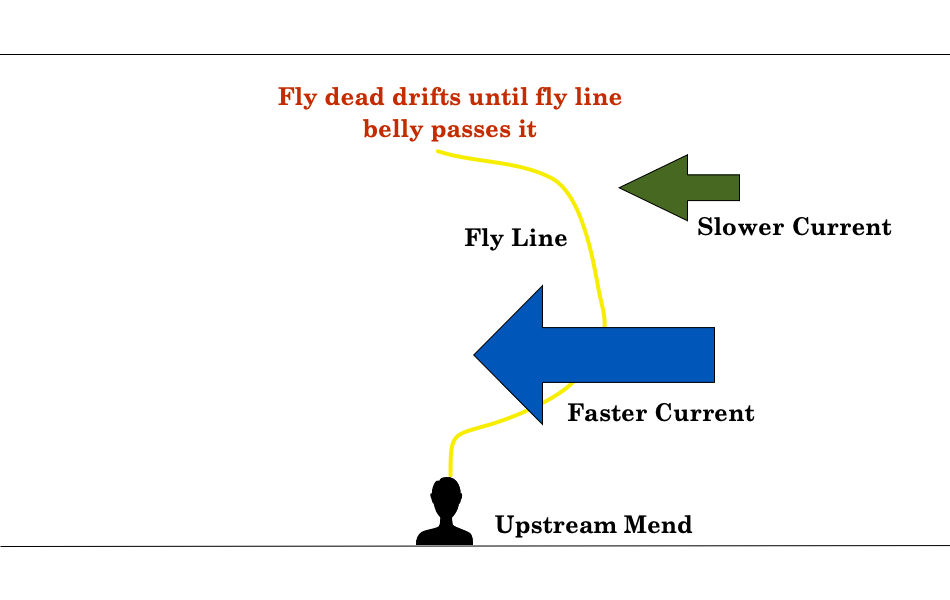
Mending line means that I am going to manipulate the line in
such a way that I put it upstream of the fly. By the time the faster current
moves the line past the fly, the fly has had an opportunity to naturally drift
through the target area. You can make this mend during the cast with what’s
called a reach cast. This is known as an aerial mend. Or you can make the mend
after the cast has landed by using the rod to flip the belly of the line
upstream. Sometimes, longer casts or longer drifts may require you to do both.
Longer drifts may also require you to make multiple mends.
Drift After Upstream Mend
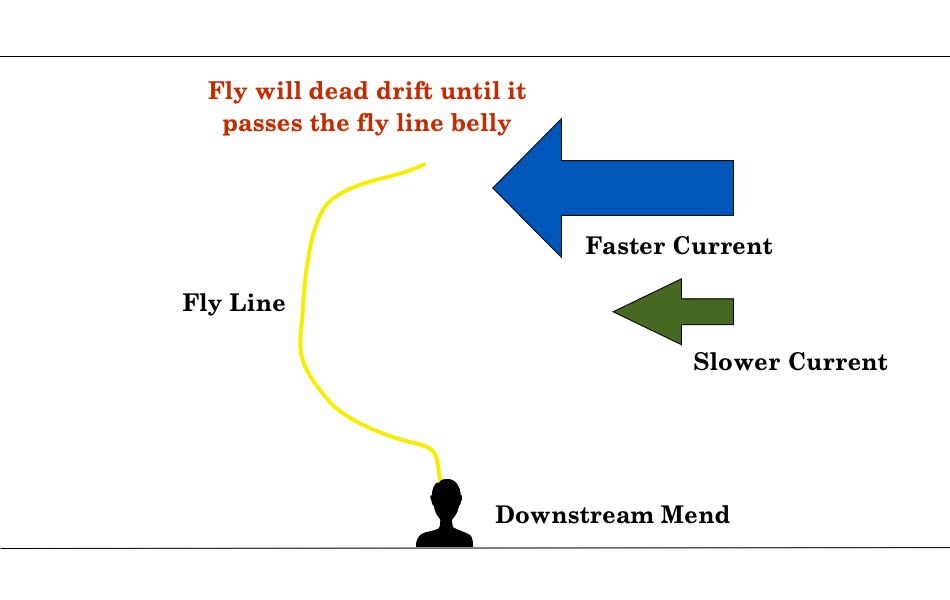
Let’s pose a similar scenario, but this time you’re casting across a slower current and the fly is landing in a faster current. Consequently, the fly will move ahead of the line, tighten and swing (drag) out of the drift lane. In this situation, you want the line downstream of the fly to give the fly time to drift before it overtakes the line. You would use a downstream mend. Like before, this could be achieved with a reach cast and/or by flipping the line downstream after it’s on the water.
Drag Setting InDrift After Downstream Mend
Mending is not easy and requires some practice because a lot of it has to do with anticipation and timing. If you wait until the fly starts to drag before you mend, you’ll move the fly out of the drift lane. You need to anticipate that the fly will drag and make your mend before, while you still have slack. This will disrupt the fly’s drift very little, if at all. Again, it will just take some practice.
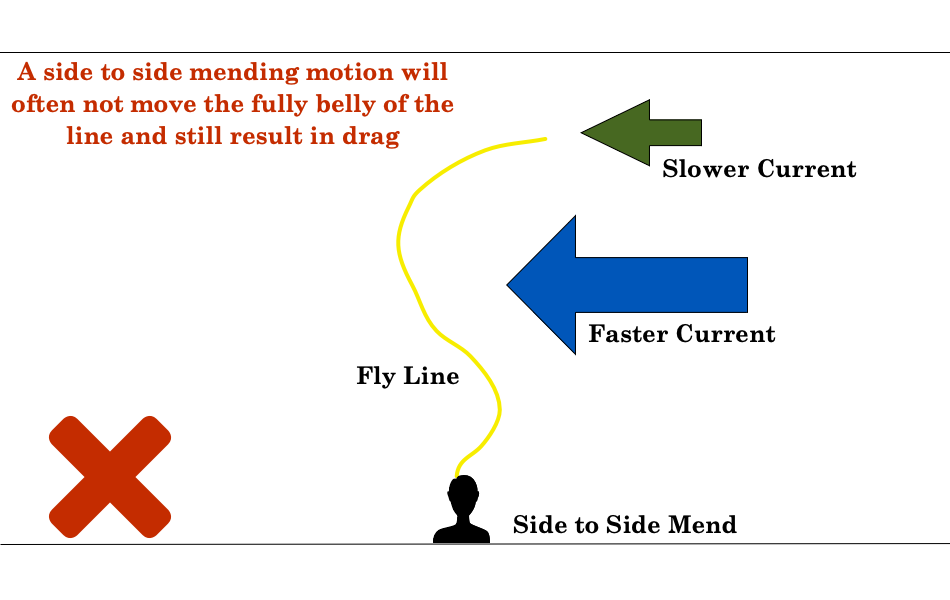
Side to Side Mending Motion
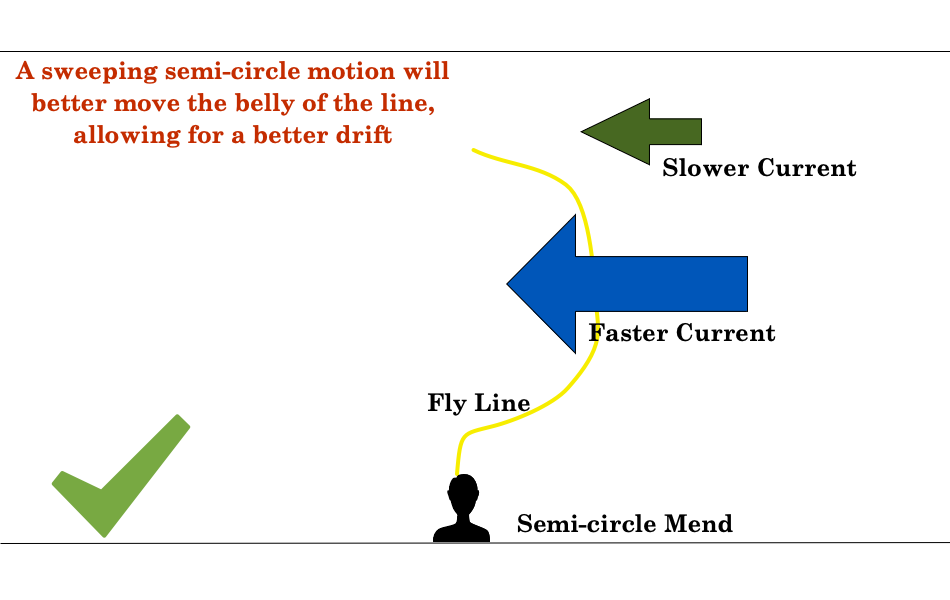
The other big key is how you mend the line. I see a lot of people keep the rod on a level plane and make a side-to-side motion to mend the line. As a result, the line pulls through the water and drags the fly. Instead, point your rod down and toward the line you want to move and make a sweeping, semi-circle motion to move the line. The idea is to essentially pick the line up and place it in a different position… without moving the fly.
Semi-circle Mending Motion
How much line you have to move will determine how big of a semi-circle you make. For instance, a big mend with a short line will likely pick the line and the fly up off the water. You don’t want that. A small mend with a long line likely won’t pick up the entire line belly, and you’ll still have drag.
As I mentioned before, it will take some practice. But it is an essential skill when drifting dry flies or nymphs to trout, especially on bigger water. Keep messing with it and before you know it, it will be second nature.
Loop knots have many uses in fly fishing, and there are probably just as many types of knots as there are uses. While it has other uses, the Perfection Loop is my favorite knot for putting a loop in the butt of a leader. Because the Perfection Loop keeps the leader “in line” with the loop, it allows for more accurate casting. Other loop knots often leave the leader at a slight angle from the loop.
Most commercial leaders already have a Perfection Loop tied in the butt section when you buy them. But if you are thinking of making your own leaders or just need to make a repair in the field, this is a great knot to know. Near the end of the video, you’ll also see how to make a loop to loop connection to attach the leader to the fly line.
On the Fly is a segment of my monthly newsletter featuring simple tips for fly fishing.
One thing that you will certainly do plenty of when fly fishing is add tippet. As you change flies through the day, you shorten your tippet. When you hang up in trees and have to break the line, you shorten your tippet. There are a few knots that you can use for this but the Surgeon’s Knot is one of the easiest and strongest. Here’s how to do it:
“On the Fly” is a feature in my monthly newsletter offering quick fly fishing tips to make your life on the water a little easier…