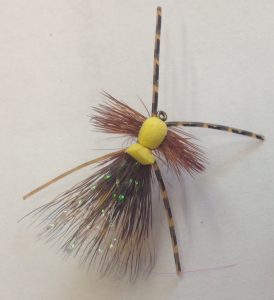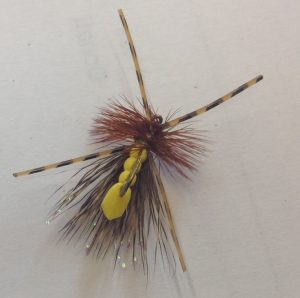
As about anyone who knows me can tell you, I’m terrible at self-promotion. The worst. So it should come as no surprise that I’ve never featured one of my own patterns in the newsletter. Usually I opt for more standard or classic patterns. But this is a good fly and it’s good this time of the year, so here you go!
I started tying this one probably 4 or 5 years ago, and if you’ve fished with me in the summertime or fall, you’ve probably fished with it at some point. Heck, you might have even caught a fish on it. It started as most fly patterns do for me, as a modification to an existing pattern. If you’re not a fly tyer or maybe if you’re new to it, you may not realize that fly tying is a lot like cooking. You can make up a recipe totally out of your head. You can follow an existing recipe step by step. Or you can take an existing recipe and modify it to better suit your taste. I’ve done all of the above over the years.
Just before this pattern was born, I was having success with a fly called a Neversink Caddis, a great little foam pattern named for the Neversink River in New York. But I got to thinking about a yellow foam body fly with a little flash. So I tied a Neversink Caddis with a little Krystal Flash under the wing. Then I thought about how great it would be to have a yellow foam body fly with a little flash and some rubber legs. So I tied a Neversink Caddis with a little Krystal Flash under the wing and rubber legs on the side. Then I started thinking about how well it might work if it was still buoyant, but rode a little flatter on the surface. You get the idea.
There comes a point where you change so many things about a chili recipe that it’s no longer chili. And after the fourth or fifth modification on this fly, it was no longer a Neversink Caddis. It was it’s own fly and it was catching fish. A lot of them. I was fairly quiet about it but had more than a few guide clients that started asking for the fly at Little River Outfitters, and it wasn’t long before Daniel asked me to tie some for the shop.

I’ve done some commercial tying in the past and it’s a grind – a whole lot of work for not much money. I remember when I first started fly fishing, I’d go to a fly shop and say, “Seriously? They charge $2 for one of these?!?” After I began tying commercially, tying hundreds of dozens of flies, I remember saying, “Seriously? They onlycharge $2 for one of these?!?” Needless to say, I wasn’t jumping at the chance to get back into the commercial tying game.
So I went a different route and submitted it and another nymph pattern to a large fly distributor. If accepted, you send samples with tying instructions, they mass-produce them, and you collect a royalty for each dozen sold. Pretty neat. It doesn’t add up to much but I collect a check at the end of each year that’s enough to take my wife to a nice dinner. I have other original patterns that I keep intending to submit but never seem to get around to it. Maybe this winter.
So that’s how the fly came to be. It’s a good fly pretty much anytime between late April and early November, but I like it best in the late summer and early fall when the water is low. In low or flat water, high-riding, bushy flies get refused a lot, and I have trouble keeping more sparsely dressed flies afloat. But Rob’s Hellbender floats great, sits lower and flatter on the surface and seems to produce strikes when its high-riding counterparts fail.
It falls under the attractor category, as it doesn’t really imitate anything in particular. I’m sure it mostly gets taken as a stonefly or hopper. Either way, they eat it and you need some. If you want to tie it, the recipe is below. Or better yet, buy a bunch at Little River Outfitters so I can take my wife out to dinner.
Rob’s Hellbender Dry
Hook: 2xl dry fly hook #14 – 10
Thread: 8/0 yellow
Underbody and rib: Thread
Body and Head: Yellow 2mm foam (tan, chartreuse, & orange work well, too)
Underwing: Pearl Krystal Flash
Wing: Deer hair
Hackle: Brown rooster
Legs: Tan barred Sili-Legs
Learn more about Smoky Mountain hatches and flies in my hatch guide.

