In the last ten years or so, the term “Euro Nymphing” or “Czech Nymphing” has become very common. It’s often billed as a revolutionary style of fishing. Basically, it is just nymph fishing without a strike indicator. It’s akin to what many for years have referred to as short-line or straight-line nymphing. Others refer to it as high-sticking. Or the old mountain fishermen around here just call it nymphing, because it’s how they’ve fished for decades and decades.
There is not a lot written about the history of fly fishing in the Southern Appalachians. Most of the techniques were just handed down generation to generation. I’ve had the pleasure and benefit of learning from many of these “old timers,” so when I first heard about this revolutionary style of fishing, I had to chuckle. There really is nothing new under the sun.
There are a few subtle differences in European nymphing techniques and what I learned to do. But what any trend will bring to the industry, no matter how long the method has been around, is the availability of new and better tools and equipment to perform the new trend. In this method of nymphing, you are really trying to keep your fly right on the stream bottom, which of course results in a lot more snags. Traditional jig hooks are great for this because they ride hook up, but until recently, haven’t been available in appropriate sizes and weights for fly fishermen.
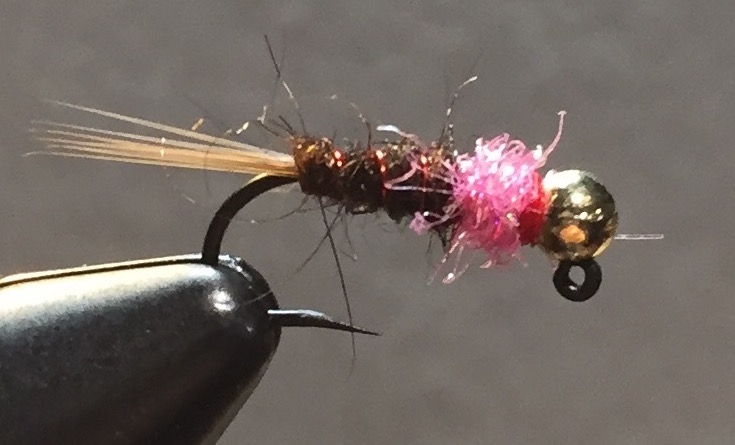
Now there are a number of micro-jig hooks available that accommodate a special slotted tungsten bead. They are perfect for fly tying and I have begun tying a lot of my favorite nymph patterns on them. However, one of the first flies I tied on them was The Frenchie. It’s a pattern that did come from the “Euro-nymphing scene” and it has proven to be an effective trout pattern on a number of different waters.
It’s basically a Bead Head Pheasant Tail with a “hot spot” of bright dubbing at the head. The original pattern uses a bright pink dubbing for the hot spot. That seems to work very well for stocked trout and even wild trout at times. In general though, I tend to have more success with wild trout using slightly more natural colors like yellow or green.
Again, it’s greatest value is that it has plenty of weight and rides hook up. You can get it down deep with far fewer bottom snags. Pick some up and give them a try next time you’re out. And if you’re a fly tyer, I’d recommend trying some other favorite nymphs like Pheasant Tails and Hare’s Ears on these hooks.
Learn more about Smoky Mountain hatches and flies in my hatch guide.
I could write thousands of tortured words on how to nymph fish. There are countless methods and variables. And they can be determined by anything from water conditions to the type of nymph you’re trying to imitate. Needless to say, it’s a little more than we can chew in a newsletter article. But consider this an introduction to what I like to call active nymphing.
I differentiate it with the word “active” because mostly, we are taught to fish our nymph(s) on a dead drift. In other words, we try to get our nymph to drift at the same speed as the current. This is usually with strike indicator, with no motion or “action” at all. In many situations, this is a highly effective method for catching trout and one that definitely shouldn’t be abandoned. But there are some situations when putting a little movement in the fly, “little” being the key word, may produce a few more fish.
If you’ve spent much time fishing nymphs, this has probably happened to you at some point. You dead-drift your nymph(s) under a strike indicator multiple times through a great run with no results. When you quit paying attention to do something else (probably change flies), the line and nymph(s) straightens downstream, dragging in the current, and a fish hits it.
Nymphs will sometimes deliberately “drift” to other parts of the stream in a sort of migration. Other times, nymphs may unintentionally become dislodged from a rock and find themselves drifting down the stream. In either case, they are most often not particularly good swimmers, and are basically at the mercy of the current. Your dead-drift nymphing technique replicates common scenarios like this. However, some nymphs, like the Isonychias mentioned in the other article in this newsletter, ARE good swimmers. They don’t drift helplessly with the current. Caddis especially tend to be good swimmers.
Soft Hackle Pheasant Tail
And at certain times, such as when it’s time to hatch, even poor swimming nymphs will uses gases to “propel” themselves through the water column to reach the surface. These nymphs are often referred to as emergers. During these times, that upward, emerging motion of the nymph is often what triggers the fish to strike. So, that fish you caught “by accident” when you let your line get tight and drag behind you may not have been such a fluke. When your drift ended and the line straightened, your nymph “swung” from the stream bottom to the surface, likely resembling an emerging nymph. The trick now, is to replicate that how and when you want to, rather than by accident when you’re not paying attention.
The best way to start with this technique is to find a good stretch of pocket water. Or a nice riffle with some deeper seams and cuts will do. With faster current, you’ll be able to get closer to the fish and employ a high-sticking method. Use a longer rod, probably 8-9’, and use a leader approximately the same length as the rod. Tie on a generic, all-purpose soft-hackle pattern, like a soft-hackle Pheasant Tail or Hares Ear, and put a small split shot about 8” above it. Forget the strike indicator.
In a smaller pocket, keep just a couple of feet of fly line out past the rod tip, and make a short cast up and across to the top of the pocket. You should be slightly more than a rod length away from your target, preferably with a faster current between you and the target (this will help to conceal you from the fish). Keep your rod tip up and out by extending your arm, and try to maintain an approximately 90-degree angle between the line and rod. By keeping your rod tip up, you can keep most of the leader off the water. If you want the nymph to go a little deeper, drop your rod a little lower. It depends on the depth of the water.
Move the rod with the drift at the pace of the current to maintain the 90-degree angle, and allow the drift to continue in front of and slightly below you. You may get a strike during this portion of the drift. If so, you’ll probably feel it since you have most of the slack out of your line, but keep a close eye on your leader. It will tighten if a fish strikes and be another cue for you to set the hook. When you reach the end of the drift (bottom of the pocket), quit moving the rod with the drift. This will force the fly to swing from the bottom to the surface. If the fish hits during this portion of the drift, you will likely feel a very hard tug.
The same method can be used when fishing a bigger pocket or a longer seam in a riffle. You may just be using slightly more line and have a little longer drift. You may also choose to try one more technique on these longer drifts. Start by doing everything as described above. When the fly and line are passing in front of you, give your wrist 3 or 4 intermittent, slight upward twitches. This will allow the fly to “jump” or “pulse” in the current. Keep in mind that you want those wrist twitches to be very slight. Quickly and aggressively “pulling” the fly from the bottom to top will not look natural.
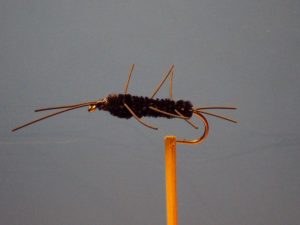
Girdle Bug
I suggested using a soft-hackle fly for this technique, mainly because the design of the fly lends itself well to the motion-based presentation. But I fish a variety of nymphs in this fashion. Definitely give it a try with your favorite caddis nymphs and emergers. And try it next time that water is a little high and stained from rain. Use a dark Wooly Bugger or a dark, rubber-legged nymph like a Girdle Bug. What you find may surprise you!
More visible leaders with colored butt and mid sections can make this method of fishing much easier. They help a little with strike detection but mostly, they help you see and track the leader and better gauge the depth of the fly. I make leaders specifically for these short-line techniques and they are available for purchase here.